
 Save
Save
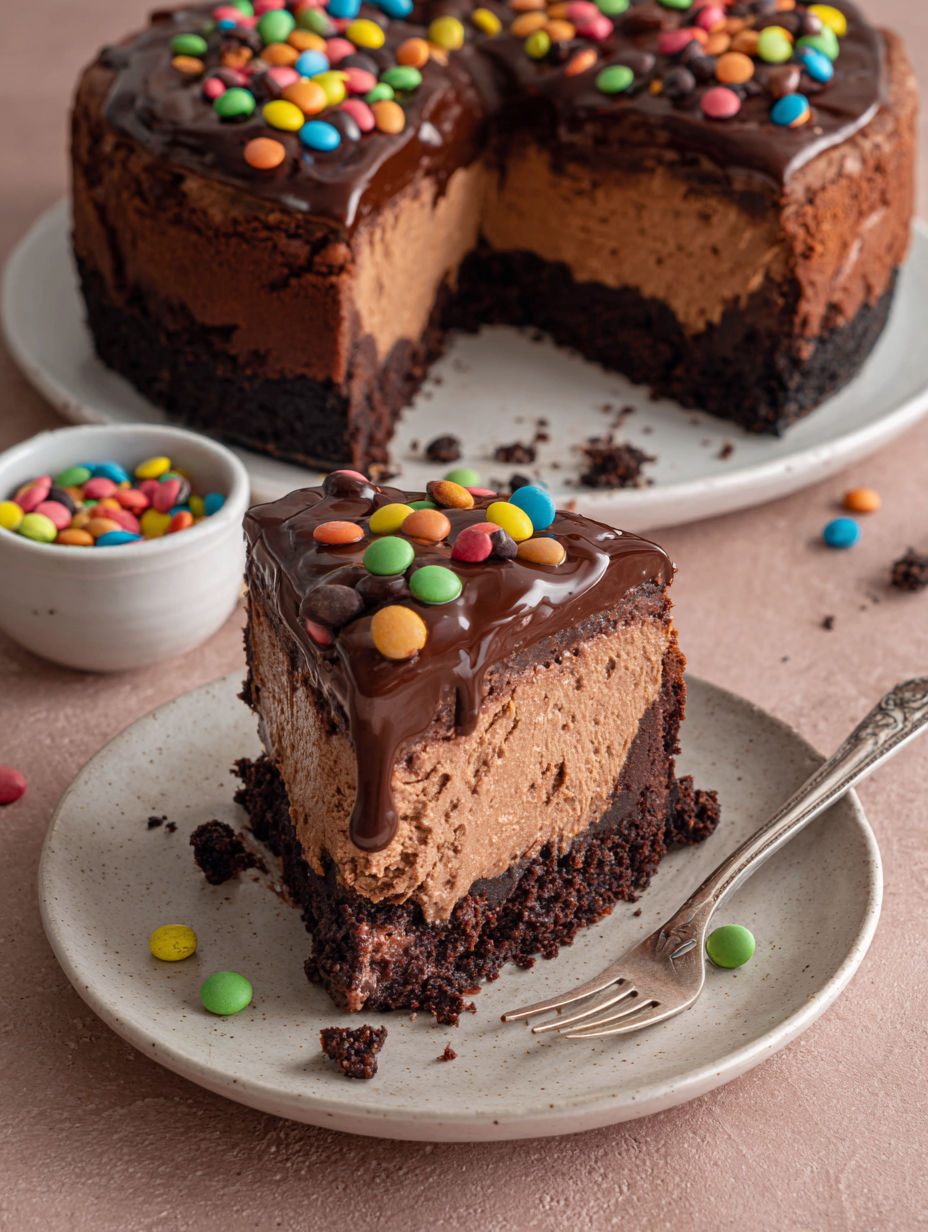
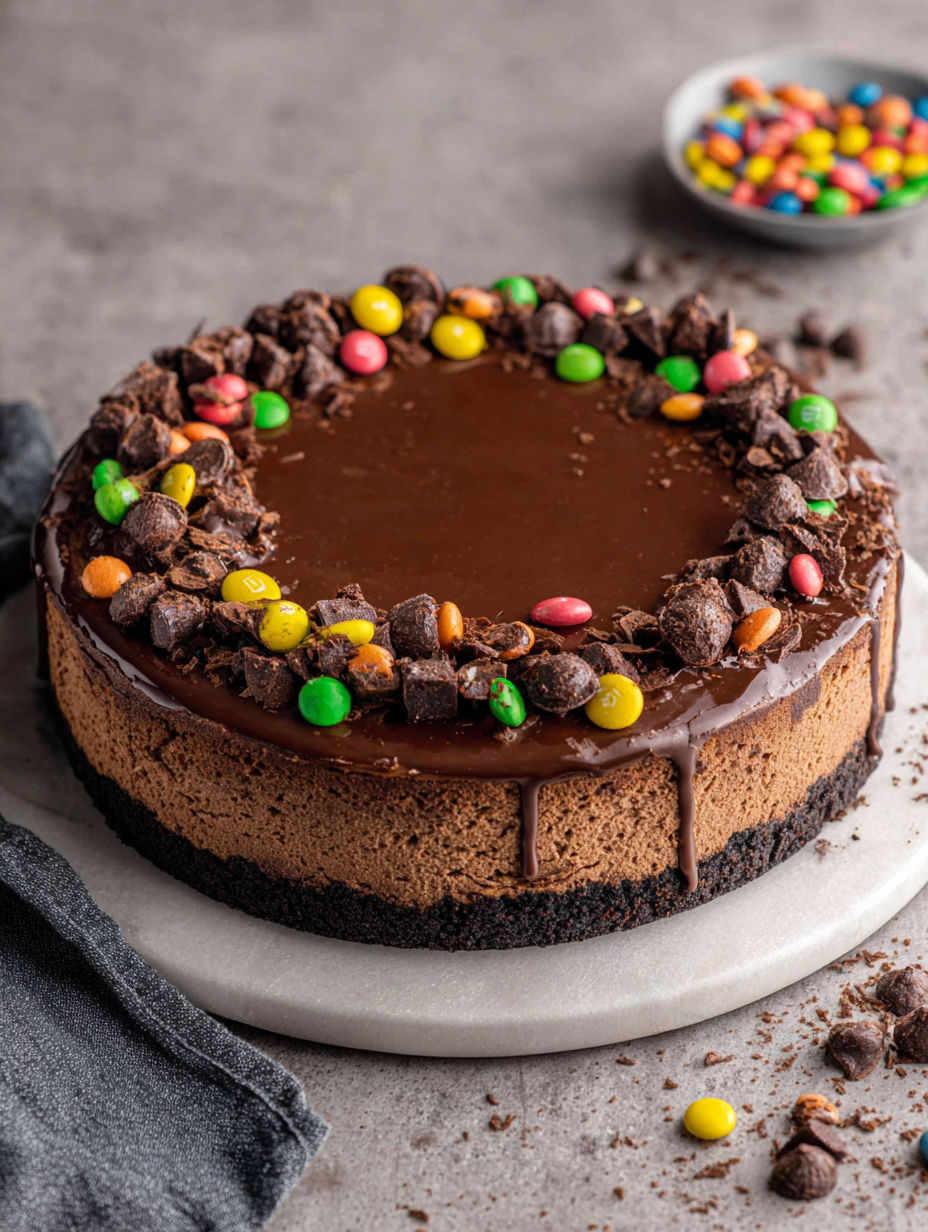
A cheesecake inspired by cosmic brownies brings back childhood memories while being an impressive dessert. It features a rich, fudgy brownie base topped with a creamy chocolate cheesecake and finished off with a smooth ganache and a burst of colorful candy pieces. It's like celebrating birthdays or enjoying after-school sweets, now refined for all occasions or just to satisfy your chocolate cravings.
The first time I made this was for my niece's birthday, and everyone wanted more. Now, all my friends request it whenever they're hit with chocolate cravings. Don’t be shocked if you see people scraping their plates.
Ingredients
- Bittersweet chocolate: Choose high-quality bars for rich cocoa taste and a smooth brownie base
- Unsalted butter: Makes the brownie soft and combines beautifully with chocolate for that fudgy texture
- Granulated sugar: Helps balance the chocolate richness and gives structure
- Large eggs: Opt for fresh room temperature eggs to get a fluffy batter
- Vanilla extract: Brings warmth to both layers; pure vanilla is best
- All-purpose flour: Use unbleached flour for perfect brownie texture
- Cocoa powder: Dutch process creates the richest chocolate flavor and color
- Salt: A little salt enhances all the flavors, so don’t skip
- Chocolate chips: Semi-sweet is ideal; not milk chocolate to avoid overpowering sweetness
- Full-fat cream cheese: A rich and creamy texture comes from fully softened cheese for easy blending
- Sour cream: Adds tang and makes the cheesecake melt in your mouth
- Heavy cream: The foundation for a silky ganache
- Candy-coated chocolate pieces: These are perfect for mimicking cosmic brownies—look for bright colors
Instructions
- Prepare the Pan:
- Wrap the outside of a nine-inch springform pan with foil and line the inside with parchment paper to keep water out during baking. This is essential for a clean and easy cheesecake removal.
- Make the Brownie Crust:
- In a microwave-safe bowl, melt bittersweet chocolate and unsalted butter together, stirring every thirty seconds until smooth. Let it cool slightly so it doesn't scramble your eggs next.
- Whip the Eggs and Sugar:
- With a hand mixer, beat the eggs, sugar, and vanilla extract until fluffy and pale yellow, which takes around three minutes on medium-high.
- Combine Wet and Dry:
- While mixing, slowly add the cooled chocolate and butter mix. Blend until shiny and smooth, then fold in the flour, cocoa powder, and salt until there are no dry bits, but don't overmix to keep brownies tender.
- Bake the Crust:
- Pour the batter into your prepared pan and level the top. Bake in a preheated oven at 350 degrees Fahrenheit for 25 to 30 minutes, until a toothpick comes out mostly clean. Let it cool while you prepare the filling.
- Make the Water Bath:
- Reduce the oven temperature to 325 degrees Fahrenheit. Place a dish of warm water on the bottom rack to create gentle steam, keeping your cheesecake smooth and preventing cracks.
- Cheesecake Filling:
- Heat chocolate chips in the microwave in 30-second bursts, stirring until melted and lump-free. Let it cool a little.
- Beat Cream Cheese and Sugar:
- With a mixer, blend your room temperature cream cheese with sugar until completely smooth and fluffy. Make sure to scrape down the bowl often.
- Add the Chocolate and Flavorings:
- Mix in the melted chocolate chips, cocoa powder, salt, and vanilla. Keep blending until creamy, then add sour cream to lighten things up.
- Incorporate Eggs:
- Add your eggs one at a time, mixing until just combined. Scrape the bowl after each addition to keep the filling smooth and even.
- Bake the Cheesecake:
- Pour the filling over the cooled brownie base, smoothing it out. Place it directly above the water bath and bake for about 60 to 70 minutes. The edges should be set, but the center should jiggle slightly when moved.
- Cool Gradually:
- Turn off the oven, crack the door, and leave the cheesecake inside for an hour. Afterward, move it to your counter for another hour. This slow cooling process helps avoid cracks.
- Chill Overnight:
- Cover the cheesecake and refrigerate for at least six hours or overnight for the best texture and easier slicing.
- Make Ganache:
- Pour hot heavy cream over chocolate chips in a bowl and let it sit for a minute before whisking until it’s glossy and smooth. Chill it slightly to reach a spreadable texture.
- Finish and Decorate:
- Remove the cheesecake from the pan and take off the parchment. Pour the cooled ganache over the top and sprinkle with candy-coated chocolate pieces for a cosmic finish. Slice and serve.
My favorite part is the creamy chocolate cheesecake filling because it's so dreamy and melts in your mouth. I remember making this with my sister the first time, and we ended up fighting over who got to lick the bowl. She still sends me pictures when she bakes it herself.
Storage Tips
Keep the cheesecake in a covered cake carrier or an airtight container in the fridge. It'll stay fresh for up to five days if you're able to save any. To freeze, slice it up, wrap each piece, and store them in a container. Thaw portions in the fridge for a couple of hours for a quick treat. If you want your candy-coated chips to stay bright, take them off before chilling.
Ingredient Substitutions
If you can only find standard chocolate chips, those will work too. The brownie base can handle dark chocolate or even milk chocolate for a sweeter option. Full-fat cream cheese is key for smoothness, but lower fat will do in a pinch, even if it’s a bit less rich.
Serving Suggestions
For parties, cut the cheesecake into smaller bars instead of big slices. This way you get fun bite-sized treats that are as enjoyable as they look. You can add a dollop of whipped cream or sprinkle some extra candy for a decorative touch.
The Cosmic Brownie Tradition
This dessert takes inspiration from the beloved lunchbox treat, bringing back nostalgia with every piece. The colorful candy shells resemble the originals but elevate with a grown-up cheesecake twist. Bring this to a birthday bash or potluck, and it’ll disappear in no time.
Seasonal Adaptations
During warm months, store your cheesecake in the freezer for a refreshing frosty treat on hot days. In winter, add a touch of coziness by dusting slices with cocoa powder or topping with chocolate curls. Around holidays, crushed peppermint can add a festive flair.
Success Stories
I've taken this to school events and office parties, and everyone loves it. One friend even asked me to make it for their birthday instead of a cake, saying it was way better than store-bought!
Freezer Meal Conversion
You can prep this ahead, freeze the slices, and have perfectly portioned desserts ready for late-night chocolate cravings or unexpected guests. Just let them thaw in the fridge to get the creaminess back.
This cheesecake will amaze both adults and kids every time it’s served. Add a little cosmic joy to your dessert spread.
Common Recipe Questions
- → How do you prevent cracks in the cheesecake?
To stop cracks, bake in a water bath and let it cool slowly in the oven.
- → Can I use a different type of chocolate for the brownie crust?
Bittersweet or semi-sweet chocolate works well, but milk chocolate is sweeter.
- → How should leftovers be stored?
Store slices in a sealed container in the fridge for up to five days. For longer, freeze individual pieces and thaw when you want to enjoy.
- → What’s the best way to slice the cheesecake cleanly?
Use a hot knife dipped in water, wiping it off between cuts for neat slices.
- → Can I substitute the candy-coated chips?
You can use mini chocolate chips, sprinkles, or chopped chocolate for fun topping options.
- → Why is room temperature dairy important?
Room temperature cream cheese, eggs, and sour cream blend better, giving a smooth and creamy texture.