
 Save
Save
This easy Halloween black cat cut out cake has saved quite a few October parties at my house when I needed something festive without hours of work. If you are looking for a centerpiece dessert that looks like you fussed but is as easy as boxed cake and frosting, this cat cake is always a crowd pleaser. The fun part is cutting and arranging the basic shapes to create an adorable cat silhouette then decorating with bold icing colors. With just the simplest pantry finds, you have a creative Halloween dessert ready to go.
I first made this for a classroom Halloween party and not only was it the first treat gone but the kids adored helping put the cat together and adding spooky colors.
Ingredients
- Chocolate cake mix: Choose a moist chocolate mix that bakes fluffy and rich I like using devil’s food for a deep cocoa taste
- Eggs, oil and water: These bind the mix so go for large fresh eggs and neutral oil for best crumbs
- Chocolate frosting: The tub from the store is just fine or you can whip up your own double chocolate buttercream
- White frosting: Important for contrast details like eyes and whiskers Aim for a creamy texture so it pipes cleanly
- Gel food dye in orange and purple: These create dramatic cat accents Gel dye will give much brighter vibrant colors than liquid
- Having everything at room temperature makes mixing and coloring frostings easier plus helps the cake bake evenly
Instructions
- Prepare the Cake Mix:
- Follow the box instructions using your preferred chocolate cake mix. Combine the eggs, oil and water, mix until smooth and divide evenly between two eight inch round pans.
- Bake and Cool:
- Bake cakes until a toothpick comes out with a few moist crumbs. Cool in the pans ten minutes then turn out onto a rack. Let them cool completely so they cut cleanly.
- Cut Out the Cat Shapes:
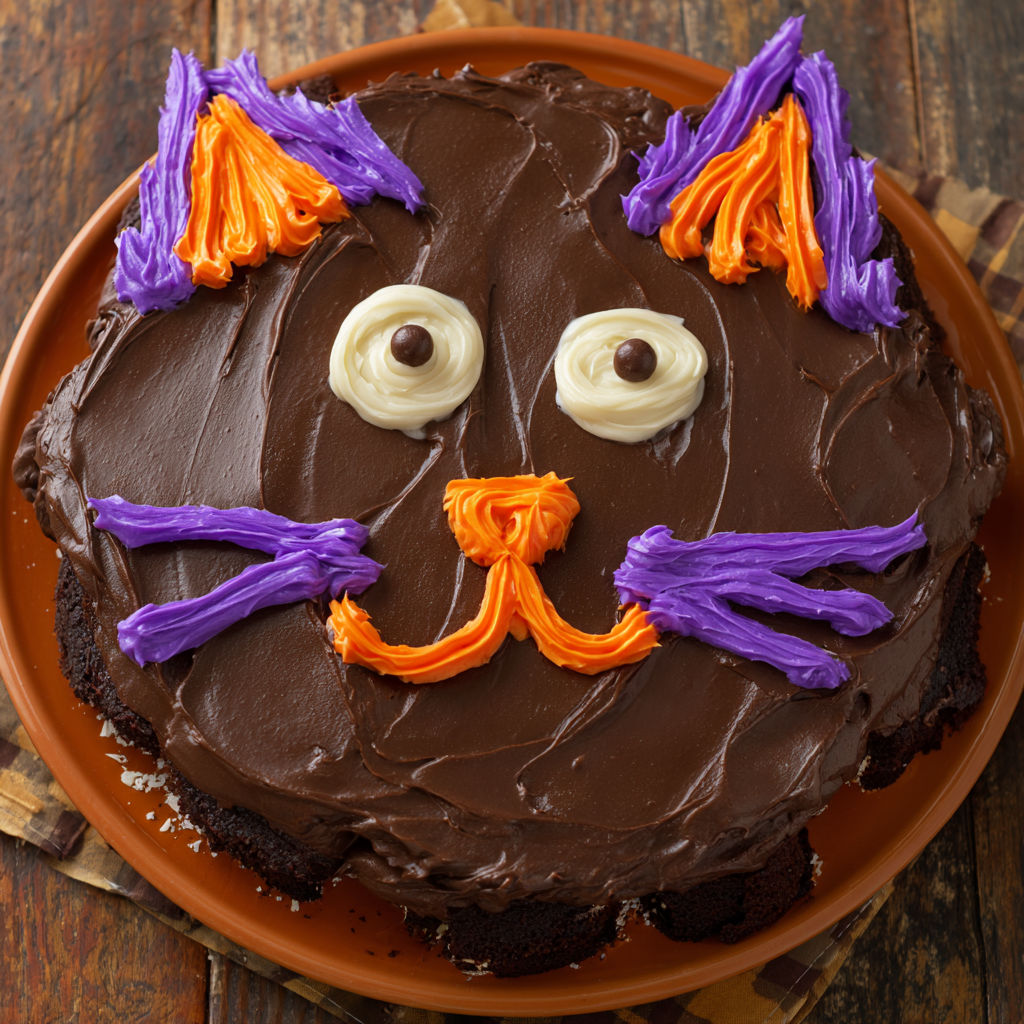
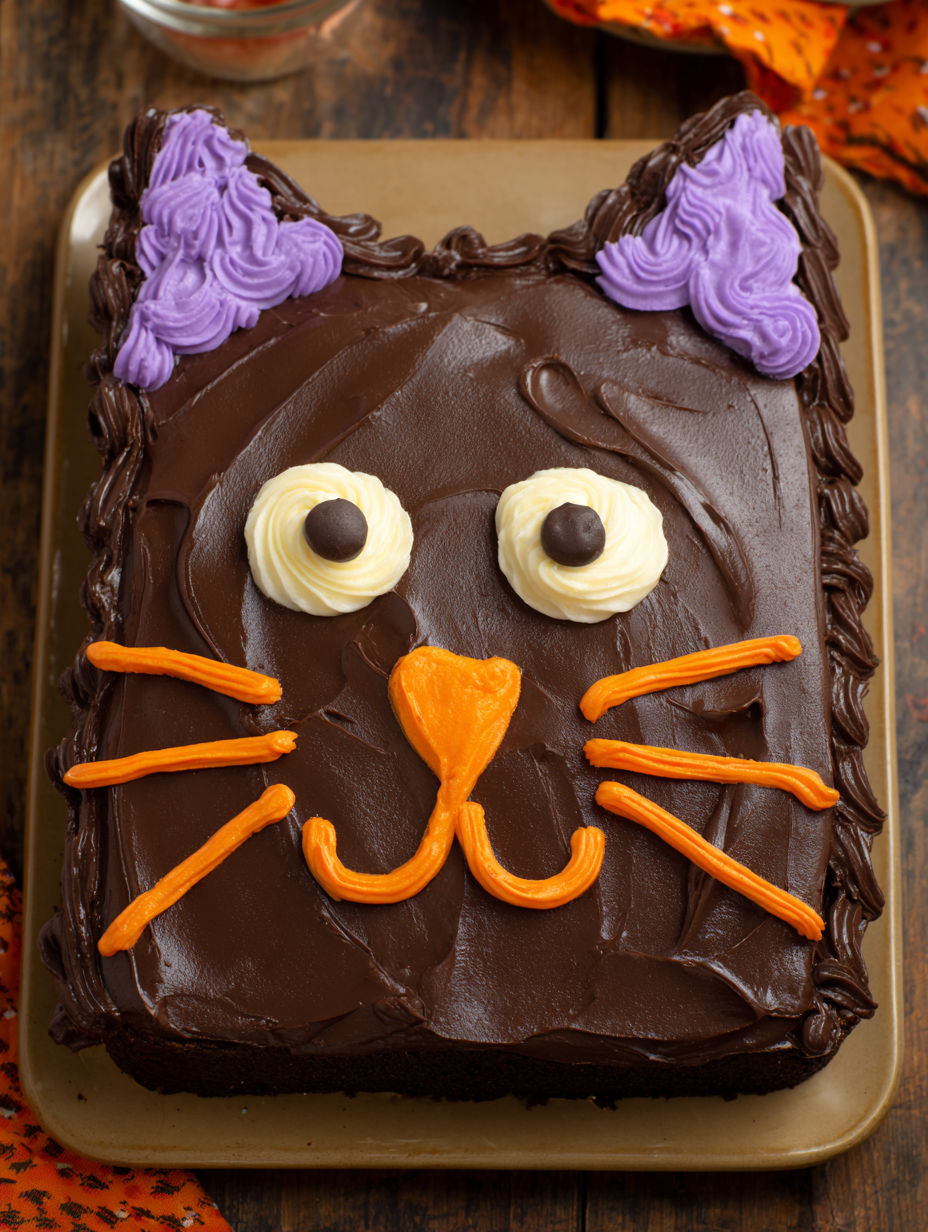
- Choose one round cake for shaping. Using a sharp knife gently cut out a curved tail, two triangles for ears and a rounded head from this cake. Each piece should be about the same thickness so the cake assembles evenly.
- Arrange on a Tray:
- Carefully transfer the shaped pieces and the uncut cake to your serving tray. Fit them together to form the body, head, ears and tail of a cat. Nestle the seams so the outline is smooth.
- Frost the Cake:
- Use an offset spatula or butter knife to generously frost all pieces with chocolate frosting. Coat every angle to seal in moisture and make an even surface for decorations.
- Color and Prepare Frosting:
- Mix your white frosting with the gel dyes in small bowls. Use orange for the nose and collar, purple for the inner ears and maybe some outer decorations. Reserve plenty of pure white for eyes and whiskers.
- Decorate the Features:
- Using a piping bag or a zip top bag with a tiny corner snipped, pipe the cat’s eyes, ears, nose, mouth, whiskers and collar. Start with the largest features then add details in layers for definition.
- Slice and Serve:
- Cut into generous squares or wedges. Serve right away or let guests admire your handiwork then dig in.

The day I let my little one pick the icing colors for this cat cake was hilarious. He decided the cat needed green eyes and a pink polka dot collar and it actually turned out cuter than my fancy attempt the week before. Sometimes letting go of perfection results in sweet surprises.
Storage tips
This cake keeps best covered well in the refrigerator for up to three days. Store any extra slices in an airtight container. If you want to freeze the undecorated cake layers let them cool fully then wrap in plastic and foil for up to two months. Defrost at room temperature before decorating.
Ingredient substitutions
If you prefer vanilla cake or even red velvet you can swap out the boxed mix. Use your favorite frostings as well. Feel free to use only store bought frosting to save more time. If gel dye is not available food coloring paste works just as well for vivid colors.
Serving suggestions
Cut generous square pieces to show off each feature or slice in classic wedges. This cake is ideal with glasses of cold milk on the side. I also love making a tiny matching cupcake cat for younger kids or as party favors.
Cultural or historical context
The black cat has roots in many Halloween legends often symbolizing mystery and mischief. Making a cat cake brings a playful approach to an old spooky motif. Black cats are considered lucky in some cultures so maybe this easy cake is a charm for your festivities.
Seasonal Adaptations
Try green and orange accents for extra eerie Halloween flair. For winter parties use blue and silver gel dye for a frosty kitten look. Add coconut flakes for a fuzzy fur effect kids love the texture.
Success Stories
Over the years I have seen guests crowd around to admire this cake and no one believes how easy it is to DIY. One neighbor told me her kids asked if their mom was a bakery chef. For teens let each person decorate their own piece for a creative party activity.
Freezer Meal Conversion
You can bake both rounds in advance let cool wrap tightly and freeze. The day before your party defrost the cakes, assemble, cut, decorate and serve as usual. This makes the busy holiday season much less stressful.
This showstopper comes together simply, with the wow factor of a custom bakery treat. Let your creativity shine and you’ll have a Halloween dessert everyone remembers.
Common Recipe Questions
- → What type of cake mix works best for this black cat cake?
Any standard 16 oz chocolate cake mix is ideal. You can use your favorite brand or even a homemade chocolate batter if preferred.
- → How do I cut and shape the cat features?
After baking and cooling, slice one round cake to create the cat's tail, ears, and head. Arrange the pieces to resemble a cat silhouette.
- → Can I use different colors for decorating?
Absolutely—use gel food dyes to color your frosting in orange, purple, or any festive shades for details like the collar and facial features.
- → Do I need special tools for decorating?
No special tools required. A piping bag or zip-top bag with a snipped corner lets you pipe eyes, mouth, and whiskers with ease.
- → Is this cake suitable for parties with children?
Yes, it's a fun and engaging dessert for kids, both for eating and helping decorate during Halloween celebrations.